How to use GoReportIt
A step-by-step help desk user guide: how to use the GoReportIt ticketing system, from creating a support ticket to assigning tickets and running the queue, grouped by what you are trying to get done. New here? Start with Getting started.
1. Getting started
Create a workspace
- On the homepage, choose Start free (or get in touch if public signup is currently closed).
- Enter your name, work email and a password, then submit.
- Check your inbox and click the confirmation link to activate your workspace. Until you confirm, you cannot log in.
The account that creates the workspace is its first admin.
Your setup checklist
A brand-new workspace lands on a short setup checklist that walks you through buying staff seats (when billing is on), adding a company, inviting your team, reviewing the starter categories and raising a first ticket. Each step links straight to the right page, and each is ticked off automatically once it is done. The checklist follows you as a banner on your dashboard until you finish or dismiss it.
Signing in
- Go to Log in and enter your email and password. Use the eye icon to reveal what you typed.
- Tick Remember me to stay signed in across browser restarts on a device you trust.
- If two-factor authentication is enabled on your account, enter the code from your authenticator app to finish signing in.
Install GoReportIt on your phone
GoReportIt runs in any modern browser, but you can add it to your home screen so it opens like an app, full screen and one tap away. On iPhone and iPad this is also what lets you turn on push notifications. There is nothing to download from an app store.
On iPhone and iPad (Safari)
-
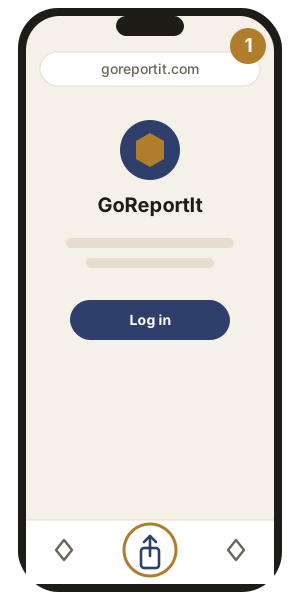
Open goreportit.com in Safari, then tap the Share button in the toolbar (the square with an upward arrow).
-
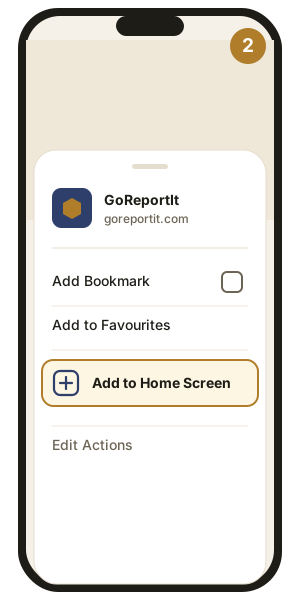
Scroll down the share sheet and tap Add to Home Screen, then confirm with Add. The GoReportIt icon appears on your home screen.
On Android (Chrome)
-
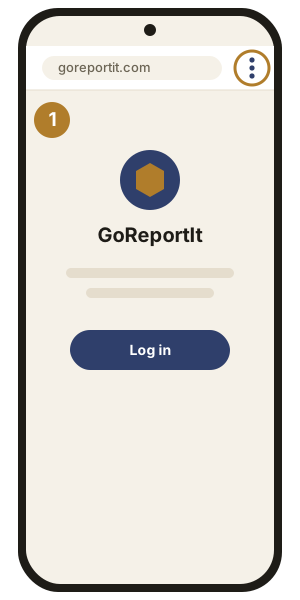
Open goreportit.com in Chrome, then tap the three-dot menu at the top right.
-
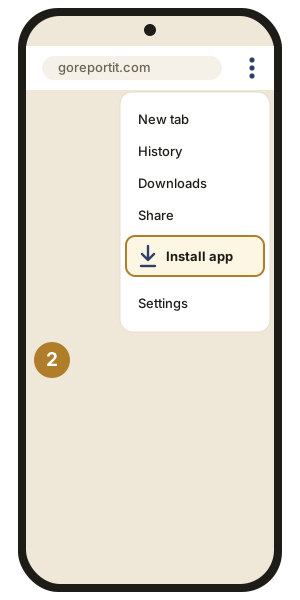
Tap Install app (some phones show Add to Home screen) and confirm. GoReportIt is added to your home screen and app drawer.
Once installed, open GoReportIt from the home-screen icon and, on the Notifications page, switch on push notifications for that device.
2. Roles at a glance
What you can see and do depends on your role:
- Reporter raises and follows their own tickets in a simple portal. They never see the team queue, other people's tickets, or internal notes. Reporters are free and unlimited.
- Agent works the shared ticket queue. An agent can be restricted to certain categories, in which case their queue and alerts narrow to those (plus anything they raised or that is assigned to them).
- Admin can do everything an agent can, and also runs the workspace: users and roles, companies and groups, categories, the on-call schedule, billing and the deletion log.
Agents and admins are "staff" and each takes a billed seat. Reporters do not.
3. Reporting and following tickets
Anyone can raise a ticket. This is the whole job for a reporter.
Raise a ticket
- Click + New Ticket (from your portal, or the Tickets area if you are staff).
- Give it a clear title and description.
- Choose a priority (low to urgent) and a category.
- Optionally attach screenshots, photos or log files (images are shown inline and compressed on upload).
- Submit. Your ticket gets a simple per-workspace number, for example #1.
Follow your tickets
Your portal shows your tickets as cards with their current status. Use the search box to find one in your own history. Open any ticket to read the full conversation and its current status, priority and assignee.
Add a comment or attachment
- Open the ticket.
- Type in the comment box, and attach a file if it helps.
- Submit. The assigned agent is notified, and their replies appear on the same ticket.
4. Working the ticket queue (agents and admins)
Find work in the queue
- Click Tickets to open the shared queue.
- Filter by status, priority, category or company, and add a keyword search that matches titles and descriptions.
- Use the quick views to jump to your own tickets or to unassigned work so nothing sits without an owner.
Triage a ticket
- Open the ticket from the queue.
- In the update panel, set the status, priority, category, assignee and the group it belongs to.
- Save. Every change is recorded in the ticket history with who made it and when.
Add an internal note
When adding a comment, tick Internal note to keep it staff-only. Reporters never see internal notes, so it is safe for the back-and-forth that should stay in the team.
Raise a ticket on someone's behalf
For a phone call or a walk-in report, you can log a ticket for a reporter:
- Click + New Ticket and fill it in as usual.
- In the Reporter selector, pick the person it is for (leave it on Myself to raise it as yourself).
- Submit. The ticket is recorded as that reporter's, notes that you logged it on their behalf, and the reporter is notified so it is never a surprise.
Move several tickets at once
From the queue you can select multiple tickets and set their group in a single action. Each move is logged like any other change.
5. Managing your team and workspace (admins)
Invite a teammate
- Go to Users and add a user with their name, email and role, plus any category access or groups.
- Leave the password blank to send an email invite: the person sets their own password and activates their account. You never choose or share a password.
- A pending invite shows a badge and can be resent at any time.
Adding or promoting a staff member (agent or admin) uses a billed seat, so you need an available seat first (see Billing).
Change roles and access
From Users, update a person's role, restrict an agent to certain categories, or change their group membership. Restricting categories narrows both what that agent sees and what they are alerted about.
Companies and groups
- Go to Companies.
- Add a company, then add the groups within it. Rename either at any time.
- A person can belong to several groups; a ticket belongs to one group, which staff can change.
Categories
From Categories, create the categories that fit your business, rename one (which updates every ticket that uses it), or delete an unused one. A category that is in use is protected from accidental deletion.
The dashboard and the deletion log
Your Dashboard summarises open and resolved counts, active work by priority, volume by category and which groups report the most, with unassigned work called out. The Logs page keeps a permanent, uneditable record of every deleted ticket.
6. Setting up an on-call rotation (admins)
An on-call rotation makes sure new high and urgent tickets reach one responsible person, hour by hour, instead of the whole team at 3am.
- Open On-call.
- Choose a priority (and optionally a specific category) to schedule.
- Pick a person, then click or drag across the 7-day by 24-hour grid to assign their hours. Assign more than one person to the same hours when you want backup.
- Save. Repeat for each priority you want covered.
How alerts route: a new or escalated high or urgent ticket goes to whoever is on call at that hour, evaluated in your workspace's timezone. If an hour has nobody assigned, the person who was on call most recently keeps covering. If a priority has no rota at all, the whole eligible team is alerted, so an urgent issue is never dropped.
Open On-call > history to see who was paged for each incident and a tally of who carried the pager, which stays accurate even after the schedule changes.
7. Notifications and preferences
Choose what reaches you
- Open Notifications.
- You see a grid of events (a ticket assigned to you, a status change on a ticket you reported, a new comment, a new high or urgent ticket, and a ticket created for you) against two channels: email and push.
- Untick a box to stop that kind of alert on that channel. Everything is on by default.
Turn on push notifications
Use the push toggle in the top navigation to allow web push in your browser. On iPhone and iPad, add GoReportIt to your home screen first, then enable push from the installed app.
Unsubscribe from emails
Every alert email carries a one-click unsubscribe, and you can resubscribe from the same link. Essential account emails (password resets, invites and the like) are always sent. Admins also receive a short daily morning brief of the tickets raised in the last 24 hours.
8. Your account and security
Reset or change your password
- On the login page, choose Forgot password and enter your email.
- Open the emailed link (it works once and expires within an hour) and set a new password. New passwords are checked against known data breaches and refused if they have leaked.
- You are emailed whenever your password changes, so an unexpected change is easy to spot.
Turn on two-factor authentication
- Open Security and start two-factor setup.
- Scan the QR code with any authenticator app and enter a code to confirm.
- Save your one-time recovery codes: they are shown only once and let you back in if you lose your device.
To turn two-factor off again, confirm your password (unless your workspace requires it for your account).
9. Billing and seats (admins)
You pay a flat price per staff seat (each agent or admin). Reporters are free and unlimited. See pricing for the current rate.
Start a subscription
- Open Billing and choose how many staff seats to buy.
- Continue to secure checkout (powered by Stripe) and enter your card. Your free trial starts, and nothing is charged until it ends.
Add or release seats
Buy more seats from the billing page as your team grows; each purchase runs on its own billing cycle and is charged when you make it. To reduce, cancel a seat batch at the end of its cycle (or resume it before then). You cannot drop below the number of staff currently using seats, and you are never charged for more staff than you bought.
Manage cards and invoices
Open the billing portal to update your card, download invoices or cancel.
If you run out of seats
If you end up with more staff than seats, for example after cancelling, the workspace becomes read-only for staff until you either buy more seats or remove staff. Reporters are never affected, and setup pages (companies, groups and categories) keep working so you are never stuck.
Still stuck? Contact us and we will help.